Commercial floor scrubber operators frequently report a sudden drop in water recovery performance.When a machine leaves a wide trail of dirty water, operators often assume the squeegee blade is worn out.
However, professional service technicians know that improper mechanical calibration causes a significant percentage of suction failures.Specifically, incorrect squeegee blade pitch adjustment or unaddressed assembly air leaks cause these failures.
For industrial cleaning contractors, mastering squeegee leveling slashes parts expenditure and minimizes machine downtime.For wholesale distributors, sharing this troubleshooting knowledge establishes your brand as a consultative engineering partner.
This guide provides a detailed, technical walkthrough for identifying vacuum leaks and calibrating squeegee pitch for flawless drying.
The Physics of Squeegee Deflection and Air Seals
To understand why pitch adjustment is so critical, one must understand how a squeegee blade interacts with a commercial floor. The rear squeegee blade does not simply scrape water; it creates a dynamic, moving seal. Under the weight of the squeegee tool frame, the bottom edge of the blade should deflect (bend) backward at a precise 45-degree angle.
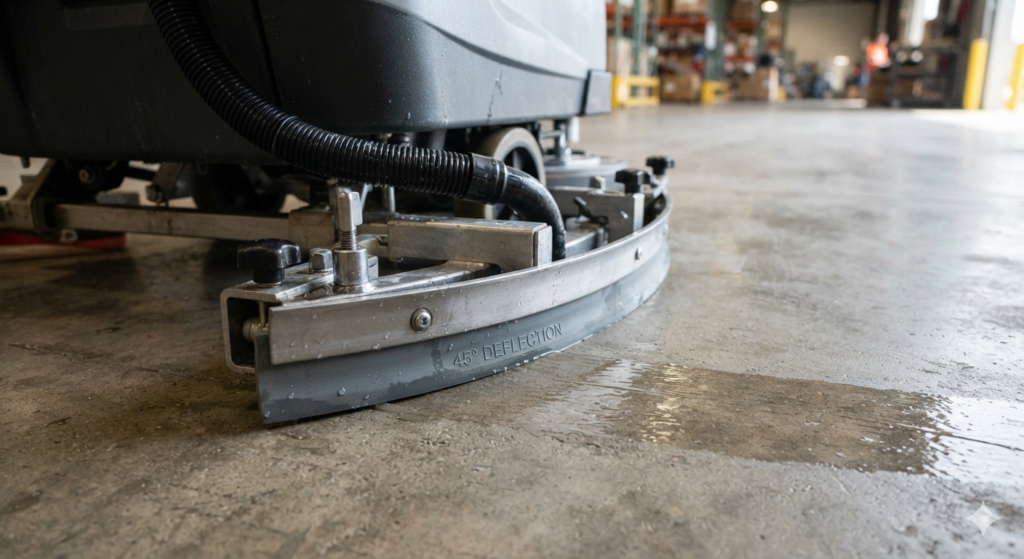
- If the blade is too upright: It will hop and chatter across the floor, breaking the vacuum seal and leaving intermittent puddles of water.
- If the blade is too flat: The wide face of the rubber contacts the floor rather than the sharp edge. This causes the blade to hydroplane over the water, dragging a sheet of liquid behind it.
To achieve uniform 45-degree deflection across the squeegee tool, precisely adjust the pitch angle to match the machine’s rear wheel height.
Step-by-Step Guide to Calibrating Squeegee Pitch
Before making adjustments, ensure that you park the floor scrubber on an absolutely flat, level concrete surface and inflate the tires to the correct pressures.
Step 1: Inspect the Blade Deflection
Lower the squeegee assembly to the floor and drive the machine forward one to two meters so the blades deflect naturally. Stop the machine, keep the squeegee down, and inspect the contact point.
Step 2: Adjust the Pitch Control Icon/Knob
Most industrial scrubbers (such as Tennant, Karcher, or Nilfisk units) feature a pitch adjustment knob or star wheel located at the center of the squeegee mount.
- If the blade is wiping only on its tips (edges leaving streaks): Turn the pitch knob to tilt the squeegee frame slightly forward.
- If the blade is wiping only in the center (center leaving streaks): Tilt the frame backward until the deflection is completely uniform from the left tip to the right tip.
Step 3: Lock the Leveling Nuts
Once you achieve uniform deflection, tighten all mechanical locking nuts so that operational vibration does not shift the alignment.

Tracking Down Hidden Air Leaks in the Suction Assembly
If the pitch is perfectly calibrated but water recovery remains weak, an atmospheric air leak is likely being encountered. A vacuum system is only as strong as its tightest seal. Ambient air rushing into the system through a crack bypasses the floor contact point entirely, destroying suction.
The Gasket Check
Inspect the main gasket sealing the recovery tank lid. If this gasket is compressed, torn, or coated in dried sludge, it will let outside air bypass the tank, dropping overall system vacuum.
The Hose-to-Tool Connection
Examine where the flexible vacuum hose inserts into the squeegee assembly. Over time, structural vibration can loosen the retention cuffs or split the hose right at the neck. Replacing warped frames with precision-molded assemblies ensures an airtight, mechanical connection. Distributors should always recommend inspecting the entire recovery chain, matching updated tool mounts with high-grade floor scrubber squeegee blades and fresh vacuum hose assemblies for optimal performance.